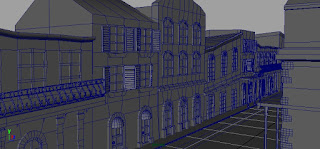
Here is a summary of the production process I have gone through this Semester to create the New Orleans town environment which features in the first half of the 'Krokodi' film.
3D Modelling
To begin, I started off by blocking out the layout of the town:
I tried to add in a quirkiness, off-balance and uneven quality to the models to add a bit more character to the buildings:I used my original concept artwork I did for the environment as a guide to the style/design of the buildings. Mainly though, I used a bank of reference photos I had gathered as a guide for extra detail specific to New Orleans:
I added in lots of railings, balcony's and window shutters to make sure the town had a New Orleans feel to it:
The buildings surround the "picnic area" where most of the action will be going on:
UV-mapping and Texturing
These are the props for the town that 'Krokodi' group member Ben modelled. I learned how to UV-map and apply textures by doing these first before the environment buildings:
As I realized there were going to be many UV-maps and texture-maps to keep track of, I produced a layout key. Each building has a colour and a number, which I have used as part of all naming conventions for files relating to the environment:
I used my concept artwork and research from last year to determine the colours I used for the buildings:
Examples of textured UV-maps for the walls of two of the buildings, I digitally painted the textures in Photoshop; applying a base colour, then adding paint strokes on to it to add some more detail:
Final textures applied to the buildings:
I had initial trouble with the UV-mapping process, however I now have a firm understanding of it and UV-mapped the whole environment, ready for texturing. To begin with I was taking one building at a time, UV-mapping it then texturing it, and I found that this was a slow process. Therefore I changed my approach and done all of the UV-mapping first before the texturing, which was a a much faster process. The texturing is still in progress as I was just concentrating on getting the part of the town done that was needed done by the Christmas review.
Lighting
Lighting for a 3D environment was a relatively new thing for me to learn. First I read up on the basics of lighting and the best types of light for different purposes. The time of day during the town scenes is early evening. I took some pictures from the windows of my house of the sky at this time of day for reference:
 |
| Looked awesome! But the colours are too lava-like for 'Krokodi's' town environment |
 |
| These colours work much better, hints of pinks and oranges hitting the edges of the clouds |
Here is a screenshot of the lights I added into the environment:
I used a Spotlight to shine over the buildings and hit the top of the orange building like the sun would do when setting in the evening in an urban environment. I also added in a digital painting of the sky in the background. I used Area lights sparingly, to added highlights on the roof of the orange building, and to add in evening purple hues to the front of the buildings in the foreground. I also added a few Directional lights for overall lighting of the scene.
I also started to make use of Light-Linking, a process of adjusting what objects in a scene a light is affecting, to allow for a more creative and customisable shot. Learning how to use Light-linking also reminded me of the importance of having a tidy Outliner, in which all objects and geometry in the scene are named properly, as the Outliner is used to select the objects that are affected by an individual light.
Rendering
I learned through tutorials and trial and error how to create and render out an Ambient Occlusion pass using Mental Ray, which adds shadow to the models:
I then rendered out the Master Layer using Maya Software. I took both passes into Photoshop. Made the AO pass into an overlay and adjust the opacity to create the image below. I think the AO pass has really helped add form and presence to my 3D environment:
I tested out creating this colourful ID pass, which can help in the compositing stage, as it allows you to select separate areas of the shot to edit:
Now that I had tested out the rendering and compositing process with my shot of the environment, I asked Carlo to send me the current Burger Van model he has been working on, and I also had Ben send me the most up-to-date rigged character 'Dee'. I imported them into the environment, scaled them to the right size within the environment and posed Dee to how she would be in shot 1 of 'Krokodi'. The weight painting is still not final which is why for example her shoulder has gone through the shoulder strap of her vest top.
I rendered out the Ambient Occlusion layer. The AO pass made the interior of the van quite dark.I composited the AO and master layer together to produce this final image. More lighting will be needed to light the interior of the van to light our main character. Also learning how to add a depth pass to create blurring in the distance and focus on the action in the scene:
The next step for the environment is to finish the textures of the other buildings which have already been UV-mapped, set up cameras for all the shots in the environment and light each of these shots as if it is its own film set, to achieve the right lighting and look for each shot.


